Universal PLS6.75: Difference between revisions
From Makerpedia
No edit summary |
No edit summary |
||
| Line 41: | Line 41: | ||
==Instructions== | ==Instructions== | ||
<ol> | |||
<li> '''Open Illustrator and create a new file.''' The size of the document should be 32" by 18", and the color mode should be set to RGB. See Fig. 1 for detailed settings. [[File:Image.png|alt=Illustrator file creation|thumb|Fig. 1]]<br />or<br />'''Open DXF file.''' Make sure the image was created in Imperial Units or set Scale: 1 Units = 1 [drawing units]. (Fig. 2) Once open, go to File ->Document Setup, and click "Edit Artboards". Make sure the width is set to 32" and the height is set to 18"</li> | |||
<li>'''Set Line Weight and Object Color.''' Depending on what kind of cutting or engraving is desired adjust the line or fill color according to the chart below: | |||
{| class="wikitable" | {| class="wikitable" | ||
|+ | |+ | ||
| Line 70: | Line 71: | ||
|Any | |Any | ||
|} | |} | ||
</li> | |||
<li> [[File:File Open.png|thumb|Fig. 2]]</li> | |||
</ol><br /> | |||
Revision as of 17:39, 3 June 2021
Available in the Student Machine Shop, the laser engraver is a Universal Laser Systems PLS6.75. It is capable of engraving on glass, stone, plastics, wood, and coated metals, and cutting through wood and plastics up to 1/2" (12mm).
Software
When using the laser engraver, it presents itself to the computer as a generic printer. Most commonly, Adobe Illustrator is used to generate print files for the laser cutter.
Materials
| Material | Engrave | Cut (Max thickness) |
|---|---|---|
| Acrylic | ✓ | 1/2" |
| Plywood | ✓ | 1/4" |
| Delrin | ✓ | 1/4" |
| Polystyrene | ✓ | 1/4" |
| Anodized Aluminum | ✓ | x |
| Powdercoated Steel | ✓ | x |
| PVC | NEVER | NEVER |
Instructions
- Open Illustrator and create a new file. The size of the document should be 32" by 18", and the color mode should be set to RGB. See Fig. 1 for detailed settings.
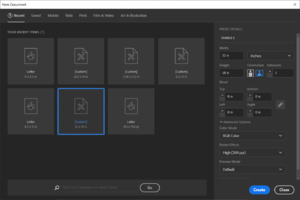
Fig. 1
or
Open DXF file. Make sure the image was created in Imperial Units or set Scale: 1 Units = 1 [drawing units]. (Fig. 2) Once open, go to File ->Document Setup, and click "Edit Artboards". Make sure the width is set to 32" and the height is set to 18" - Set Line Weight and Object Color. Depending on what kind of cutting or engraving is desired adjust the line or fill color according to the chart below:
Mode Line Color (RGB) Fill Color (RGB) Line Weight Surface Engrave (images, text, etc.) Any (0,0,0) > .1 pt (if Through Cut (255, 0, 0) None .1 pt Vector Etch (scribe line) (0,0,255) None .1 pt No operation (255, 0, 255) (255, 0, 255) Any -
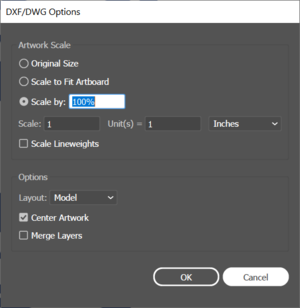
Fig. 2

